Friday, 22 March 2013

DIY: Bird House

Don't miss any update from my blog. connect with me on my Facebook page click here.
So it's my third DIY/recycling project in this month. Isn't that fantastic. Well the first one was Decorative tray made out of old newspapers and the second one was hanging planter made of plastic bottles.
I am sure that this third one that is bird house made of plastic food container, you will enjoy more than any other DIY in this blog. Before summers arrive be ready to provide food and shelter to lovely little birds. This project is kids friendly and you can involve your little one also. Let's start here:

1. Gather your supplies

http://designdecoranddisha.blogspot.in


     1. Cardboard
     2. Scissors
     3. Knife
     4. Paper rolls (how to make learn here)
     5. Glue
     6. Plastic food container
     7. Food container's lid
     8. Acrylic color
     9. Brushes
    10. Twine/rope

Step 2. Make a small hole at base of plastic container.

http://designdecoranddisha.blogspot.in

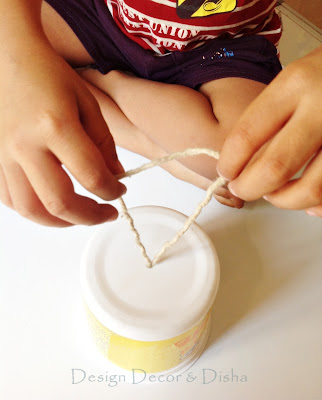
Step 3. Insert both the end of twine in this hole to make a loop and make a knot inside the container. It will look like as shown in image below. It will be used for hanging the bird house.

http://designdecoranddisha.blogspot.in


Step 4. Put the lid on, press it properly.

http://designdecoranddisha.blogspot.in

Now glue the lid using hot glue gun.

http://designdecoranddisha.blogspot.in

Step 5. Now it's time to prime it. Use acrylic color.

http://designdecoranddisha.blogspot.in

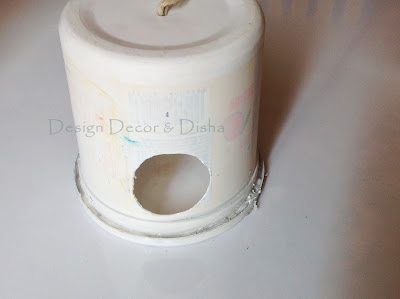
Step 6. Now cut circular shape 2 cm above the base of the container that will serve as an entrance.  

http://designdecoranddisha.blogspot.in

Step 7. It's time to make a roof. Cut the cardboard as shown below.

http://designdecoranddisha.blogspot.in

Put one end on the other and glue it.

http://designdecoranddisha.blogspot.in

Step 8. Here you will need all the paper rolls. Start sticking rolls one by one on this cone shaped roof or you can skip this step and directly paint this cone in your choice of color.

http://designdecoranddisha.blogspot.in

Step 9. Now the roof is also ready. Prime it and then paint both the roof and house in your choice of color. Don't forget to give a top coat of varnish.

http://designdecoranddisha.blogspot.in

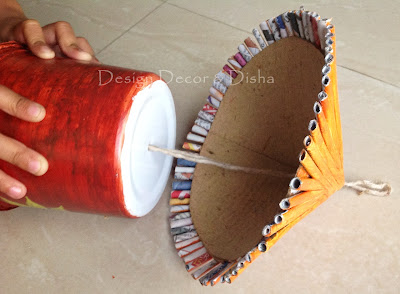
Step 10. Now pull out the twine loop from a hole on the top of the roof. Bird house is ready.

http://designdecoranddisha.blogspot.in

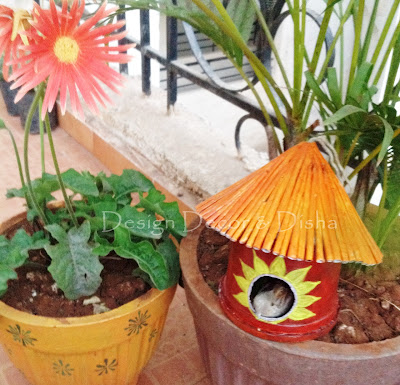
This is how my birdhouse looks. My Son enjoyed this DIY thoroughly and I am also very happy to see how it turned out :)))

http://designdecoranddisha.blogspot.in

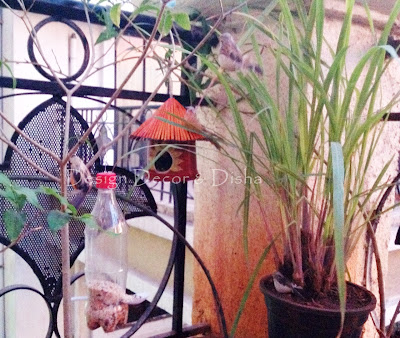
I tried placing and hanging it around different places in my garden until I found suitable one.

http://designdecoranddisha.blogspot.in

Near bird feeder.........

http://designdecoranddisha.blogspot.in

Under the palm.........

http://designdecoranddisha.blogspot.in

Between money plant.........

http://designdecoranddisha.blogspot.in

On the pillar............
http://designdecoranddisha.blogspot.in


http://designdecoranddisha.blogspot.in


http://designdecoranddisha.blogspot.in


http://designdecoranddisha.blogspot.in

And finally hung on a branch which I found the most suitable place in my garden as this part doesn't get lot of sunlight.

http://designdecoranddisha.blogspot.in


What do you think of my bird house. Do you have a bird house share your images on my Facebook page and I would love to feature it in my blog :)


Thursday, 21 March 2013

Easter Decor 2013


 It's almost Easter...


Easter decor is placed and fluffed...no other words needed.


These parties I love to link up to or check out my Blog Parties tab
Monday
Party Time @ It's So Very Cheri
Metamorphosis Monday @ Between Naps On The Porch
Motivate Me Monday @ Keeping It Simple  
Make it Pretty Monday @ The Dedicated House
Masterpiece Monday @

Tuesday, 19 March 2013

Fabric, Paint and Spring!

You know the deal ... you're in your favorite fabric store ... looking for fabric for, ohhhh, let's say, your son's bathroom, when, all of a sudden, you spot a fabric that would be perfect for your dining room!

Not that anything was particularly *wrong* with the gold fabric (shown below) that you've had in there for the past few years ... wait, on second thought, I guess there was.


There was just SOMEthing about this new fabric that called out to me ... perhaps it was the gorgeous patterns filled with beautiful shades of grey, white, slate blue and a deep "dijon" ...


or, maybe it was because I knew that it would nicely complement the French script fabric on our chairs ...  


along with our furniture and accessories!  


Oh, and don't let me forget to mention it's normally $30 per yard, but, because it arrived from the manufacturer in runs of 3 or 4 yards, it had been marked down to $16 per yard!  Obviously, that pretty much sealed the deal!

After the new panels were hung (and I squealed), I turned my sights on our humongous mirror that was now calling out for a bit of attention.  It wanted to be fancy like the new fabric.  So, with a small craft sponge brush, I gave it two coats of gold paint (that I had on hand) ... hurray for free projects!


Of course, I then had to add a few eggs to celebrate the season!


And, naturally, the table was next ... 


I brought out our sweet bunnies (from Pier One) ... 


and, scattered a few speckled eggs on the runner in pretty shades of blue, green and cream.


New fabric ... a *pizazz-y* mirror ... and a touch of Spring!  Just what the decorating doctor ordered!


Now, a-BOUT that fabric for my son's bathroom ....!  LOL

As always, thanks for stopping by ... come on over and party here:

My Uncommon Slice of Suburbia/Tuesday's Treasures
Savvy Southern Style/WUW

post signature

I Won a Silhouette!


This SPRING banner is the FIRST completed project with my new Silhouette Portrait cutting machine.


Thanks to Ginger at Ginger Snap Crafts for hosting this awesome giveaway and Silhouette for the truly fun cutting machine that I will spend loads of time using! Imagine my surprise when I found out I won! It was like Christmas morning and I was a 5 year old again!!


It is easy to learn

Saturday, 16 March 2013

Ball & Claw


Lately I have been infatuated with
 Annie Sloan's Old White and French Linen Chalk Paint.


I adore the combination of these two colors...


So old world, so classic, so today!


This chair that I picked up last summer, at a garage sale, was sitting around in the hobby garage just waiting for it's makeover.


Someone had painted it blue and recovered the seat but I could tell that

Friday, 15 March 2013

DIY: Plastic Bottles Hanging Planter

Don't miss any update from my blog. Like my Facebook page click here.
I love recycling and do lot of recycling and up-cycling projects. Checkout my earlier recycling projects here Here is one more DIY that you must have seen lot of times on various sites but this one is little different as I made hanging bottle planter.  These bottles were lying in my store for quite some time now and waiting for me to turn them into something useful. I have a big green thumb so lot of my projects involve gardening. 
If you also have some plastic bottles lying unused then get ready and let's make a beautiful, colorful hanging planter to add pop of color in your garden.

Step 1. Gather your supplies. All you need is :
3-4 Plastic bottles
Knife 
Acrylic paint
Brush 
Rope
Potting soil
Plants
----------------------------------------------------------------------------------------------
First of all wash the bottles and let them dry.

http://designdecoranddisha.blogspot.in/

Step 2.  Cut the middle of the bottle in rectangular shape as shown in image below. Don't cut a big rectangle make it small just to plant saplings there. Now make three four very small holes opposite to the rectangular cut for water drainage.

http://designdecoranddisha.blogspot.in/


Step 3. Now it's time to prime all the bottles with either acrylic white paint or enamel paint.

http://designdecoranddisha.blogspot.in/

Step 4.  Now paint all the bottles in color of your choice. may be in gradient color or in contrasting color or monochromatic choice is yours.

http://designdecoranddisha.blogspot.in/

Step 5.  Now tie both the ends of bottles with the rope as shown in picture to hang them in your garden.

http://designdecoranddisha.blogspot.in/

Step 6.  Put some small stones first then fill the potting mix in bottles leaving 1.5" space  unfilled. Place saplings and fill the bottle completely with potting mix.

http://designdecoranddisha.blogspot.in/

A closer look of my bottle hanging planter.......and can you spot that little Mr. Turtle more about him little later :)))

http://designdecoranddisha.blogspot.in/

Just few simple steps and you can make a rocking garden. 

http://designdecoranddisha.blogspot.in/

Few more plastic bottles recycling projects are coming so stay tuned.
Recycle recycle and stay creative!! Have a wonderful weekend :)


Tuesday, 12 March 2013

Clover Luck


I purchased these precious German Bibles at a local thrift store.


What struck me about them was not that I too have a German heritage, but they matched, however the smaller (female) version was inscribed with the name,

Frieda U. Siemers, 1906


And the larger (male) version did not have an inscription, but instead had his name beautifully penned inside, Mr. Henry Siemers.

Imagine how I