Friday, 27 March 2015

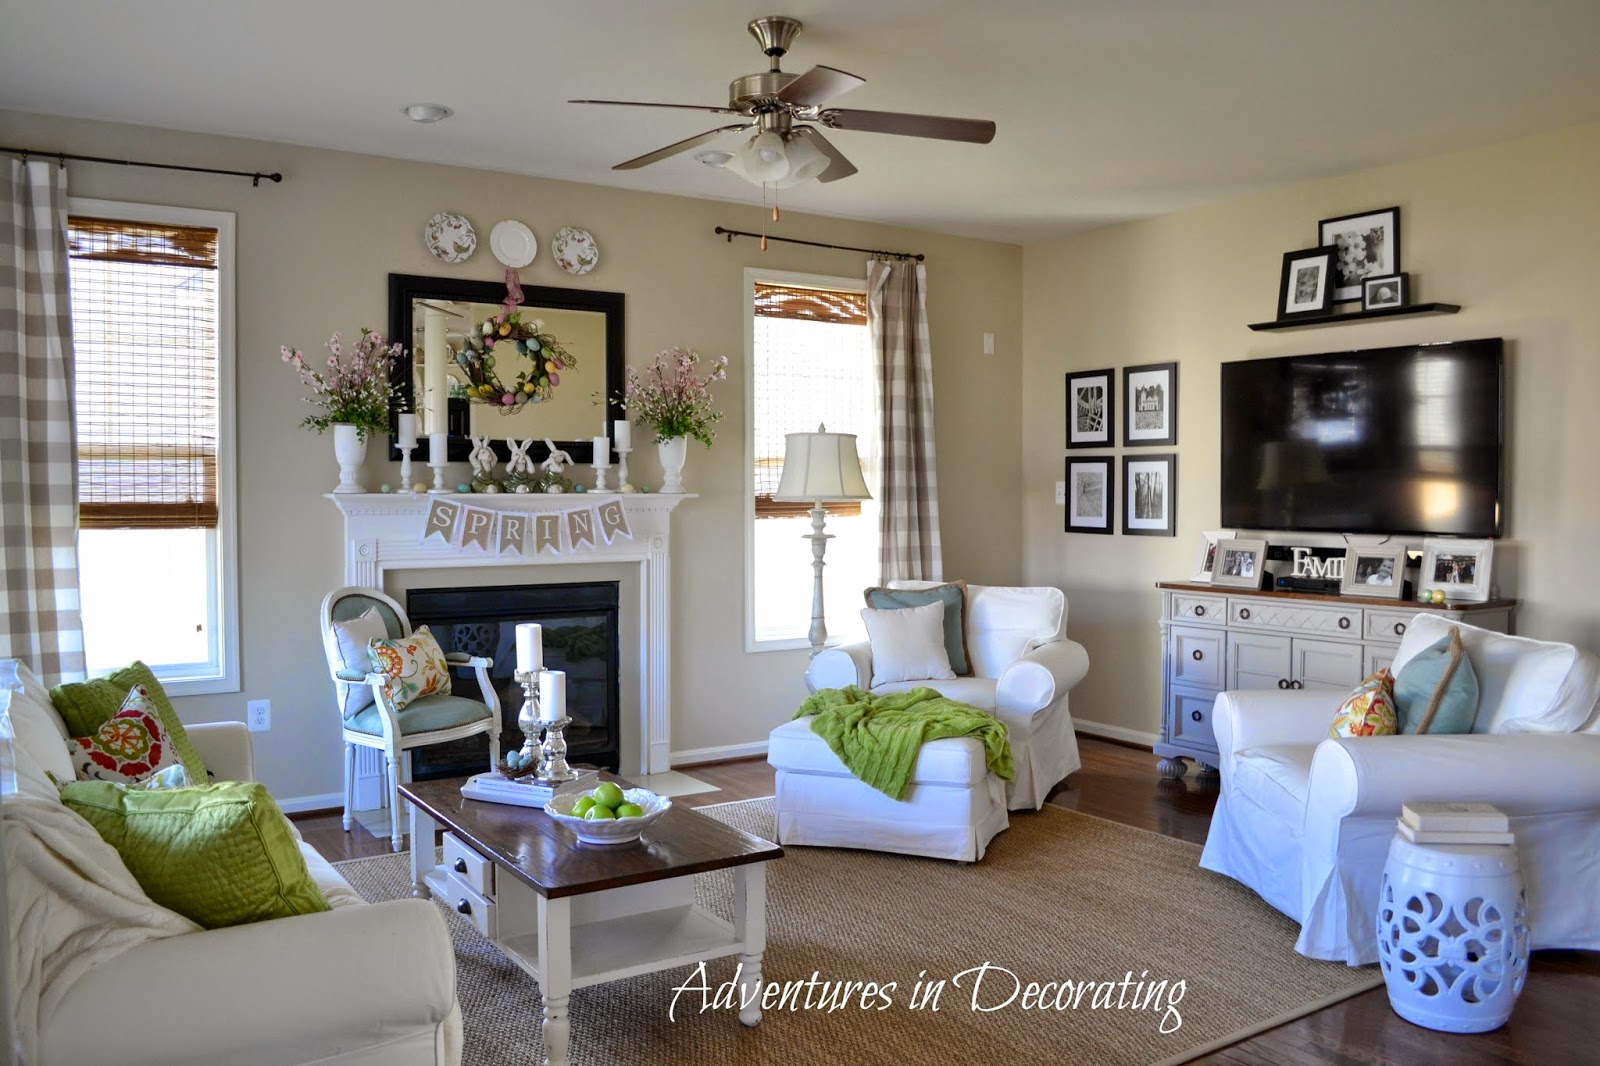
2015 Spring Great Room

Greetings, friends!

Can you believe there is only one week until Easter?  Before it comes and goes, I wanted to share our great room, dressed up for Spring!

I don't know about you, but when it comes to decorating, I like to start with a "blank slate," before transitioning to a new season or holiday.  I take the existing pillows and accessories away for a bit ... it clears my mind and helps me visualize what I want to do next.  That's what I love about having a white Ektorp sofa now ... for me, it's the perfect starting point and backdrop as any colors play nicely with it!

BEFORE: "nekkid"


AFTER:  MUCH better with color!


I broke out our apple green pillows, along with cute floral pillows from HomeGoods.  Of course, white flowers bursting out of a glass demo-john were in order for the sofa table.


I then added in our cute faux plants from IKEA ... and, to give them a bit of  height so that they weren't "hiding" behind the sofa, I perched them on top of white candleholders (also from IKEA).


Nothing says "Spring" like a crisp white bowl with faux green apples tossed in, now does it?


Let's not forget a little nest occupied by cute eggs doused with Annie Sloane's Duck Egg chalk paint.


If you glance on over from there, you'll see our mantel dressed up for the Easter Bunny's arrival!


Yes, my middle name should be "faux" because, once again, I'm adding such florals into my decor.  Alas, when you have a "brown thumb" like I do, faux is always my best (well, ONLY) option!


I also brought back the "Spring" banner that I found at Target a few years ago.  The letters (stenciled onto burlap) used to be layered over pastel colored felt, but because I wanted to change it up a bit, I decided to cut off the burlap with the letters and layer them over white felt instead.


Our cute bunnies are back center stage this year ... reminding us all, yet again, to "hear no evil, see no evil and speak no evil."


Down below, our chair got a little makeover, too, thanks to Annie's Duck Egg chalk paint.  Yes, I painted the fabric, and we love it!


Ta DA!


These colors are a welcomed change since it means that warmer temps are on the horizon!


Over on this side of the room, I played a little musical chairs by switching out our white slipcovered wing chairs for somewhat more relaxing EKTORP chairs that I bought off of Craigslist when we first moved here last summer.  They had sage green slipcovers on them, so I removed those and covered them in white slips instead. With IKEA's white slipcovers for these chairs being only $29 a piece, it was easy to justify that tiny splurge!


That inexpensive purchase helped me justify a-NOTHER splurge by buying the matching ottoman while I was there (oops).  I just couldn't help myself!


And, there you have it ... our Spring great room. 


And, see that *lovely* ceiling fan in there?  Well, soon, it will be heading upstairs to our son's room, and this beautiful chandie from World Market (that my sweet husband and son surprised me with for my recent birthday) will hang in its place ... can't wait!


I'll be back soon to share our kitchen, which I not only dressed up for Spring, 


but also made a few other changes ... down came 2 more cabinets (thanks to my awesome hubby) ...


and up went more shelves, along with a faux brick backsplash!


Ahhhhh, home projects!

Thanks for visiting,

post signature

Tuesday, 24 March 2015

Cutest Pink Baby Shower! Part 1


You might be asking yourself...

Where has Terry been from Forever Decorating?
She just is not posting as much!

Well, I am here to tell you that I have
been quite busy...

When I found out that I was going to be
a Grandma, I patiently waited until my
daughter was 22 weeks along to find out the sex of the baby...

Then started making the cutest PINK shower decor that I could think of!


Monday, 23 March 2015

DIY Owl Planter

Sometimes most of the time I get innovative ideas in my dream about my art and craft work. 
Few days ago I saw tiny clay pots kept on my kitchen window sill and the same night I saw owls made of those tiny clay pots in my dream. Next day without giving it a second thought and without any planning I just started making owl planters and viola!!! the result was awesome. See here they are..

Owl Planter tutorial

 I even named them Peter and Paul. All my readers and Facebook page fans wanted me to share the procedure of making Peter and Paul. So here is the procedure:

  • Supplies:
       Hobby ideas Shilpkar/M-seal
       Carving knife/ craft knife
       Glue
       Talcum powder
       Plastic sheet
       Clay pots (any size)
       Acrylic paint
       Paint brush
       Varnish       
  • Procedure:
1. First wash the clay pots thoroughly and let it dry. Now You can apply a coat of varnish inside the pot to seal it.

2. Now prime the outside of pot with white acrylic paint and let it dry. In below image you can see Hobby Ideas Shilpkar. It contains two packets, one is resin and the other is hardener. Take equal amount of both resin and hardener and mix them well. 

Owl Planter Tutorial


3. Keep the plastic sheet on working area and dust it with talcum powder to avoid Shilpkar clay sticking to sheet. Now take a small amount of clay, put it on sheet and roll it out as shown in below image. For rolling you can use pen or pencil.

Owl Planter Tutorial


4. As I didn't have carving knife I used craft knife to give shape and cut the clay. Though the carving doesn't look neat when you use craft knife. You can use something else like toothpick, empty ball pen or anything else that can solve the purpose better. 

Owl Planter Tutorial


5. Made two carved parts (left and right) and joined them. Then I took small amount of clay, made beak of owl and pasted it on carved clay. Now gently pick up the clay and paste it on the pot.

Owl Planter Tutorial


6.  I made two different kind of owls. It was hard to make features of Peter so I went easy on making Paul and gave it simple look. When it is dried prime it too. 

Owl Planter Tutorial

7. Now the last thing is to paint it in your desired colour and let it dry. You can give a protective coat of varnish if you wish.  It's done!!! See how I am using my Peter and Paul..........

Owl Planter Tutorial

Owl Planter Tutorial

You can see the before and after of my tiny clay pots in image below. 

Owl Planter Tutorial

Some of my artwork that is exclusively mine and not inspired from any other source, you can check out on 'Exclusively By Design Decor & Disha'. 

Stay tuned!!In my next blog I will be posting about my work-space makeover. 


Saturday, 14 March 2015

My First Commissioned Warli Wall Art

It all started when a couple decided to move back to India from Singapore after spending years there. Let me introduce you to this wonderful couple, Mr. & Mrs. Nihalani who now own an appartment in Pune and have done it up very aesthetically. Their home reflects their warm personalities.

Mr. Nihalani is a perfectionist and has got an eye for beauty and details. The moment I saw their home, I was completely awestruck by his good sense of aesthetics. Whereas Mrs. Nihalani is a very warm, pleasing, soft spoken and sophisticated lady. They have a son, who is working in Singapore and a daughter, who is in New Zealand and just completed her bachelor's degree. Their family is a sweet and small family. 
Since Mrs. Nihalani had left her job, she was having quite a lot of spare time in her hand to explore new things. She decided to take up the activity that she has never done before. She never tried her hands on painting so she chose to learn to paint. Being a motivating husband Mr. Nihalani suggested to go for Warli painting for its simplicity. She then searched about Warli on Google and stumbled across my blog, she contacted me, we exchanged few mails and then she was all set to learn this art from me. Within a month she not only learned but mastered this art form. Given her non-artistic background I was totally stunned by her grasping power and enthusiasm to learn new things at this phase of life. Here is how she excelled in Warli art. 

Warli Painting

It didn't stop here. Couple wanted to do makeover of their balcony which was plain and dull at that time. She asked me if I am ready to take up this project and I accepted the opportunity without further ado. But she put across one condition that she will going to accompany me while I will be doing this project and who will not accept such a sweet proposal. 
We started the project in October last year. She took out some printouts of Warli paintings she liked and showed them to me. It gave me fare idea what exactly they wanted. Here is the layout of their balcony. Wall 1 and wall 2 are adjacent and door is between them. 


Here I have created panoramic picture of their balcony to give you rough idea about how it looked earlier.

Warli Painting On Wall

Wall 1:
We started with wall 1. It was primed and painted. This wall was painted keeping Mr. Nihalani's choice in mind. He wanted the village scene painted in white on this apricot colour wall and dancing Warli figures on white panel above in apricot colour.
I drew few village scenes on paper and they chose one with few modifications and then started this beautiful journey of my first commissioned Warli painting on wall. First we traced design on the wall. Here you can see us in action :)

Warli Painting
After tracing was done, we were ready with our brushes, paints, water & rag. Then began the fun part of painting the wall. Everyday while painting Mrs. Nihalani would put on some music and we would get lost in some other world. It was an amazing experience for me. She even told me her love story too :)
Here is how our work progressed....

Warli Painting

I liked the dancing Warli figures on panel above. I used huge step ladder to paint these figures....see it was kind of adventurous too. 
Here are some close ups of the wall. I like little flaws here, they make the painting look all the more beautiful.  

Warli Painting On Wall


Warli Painting On Wall

Horse here is looking more like puppy, but during final touch up I tried my best to make it look more like horse.

Warli Painting On Wall

Almost all small figures are done by Mrs. Nihalani. See I told you she not only learnt but also mastered this art.

Warli Painting On Wall


Wall 2:
Now comes the second wall. It was painted according to Mrs. Nihalani's choice. She wanted a Warli marriage theme painted in earthy tones on the wall 2. She loves warm and earthy tones so we chose burnt sienna, orange, copper, pale yellow, green and little bit of red.
Here is before picture of the wall.

Warli Wall Painting

I followed the same procedure of drawing few designs first on paper, She chose one, then I traced it on the wall and finally painted it. 
Here are some images of different figures that I made on wall.

Warli Painting On Wall


Warli Painting On Wall

In the middle is doli of Warli bride and to the right and left of it are Warli men and women, dancing and celebrating the occasion.

Warli Marriage Scene

Warli Painting On Wall

Below is the picture of the wall that was almost done, the only part left was filling some patterns here and there to make it look perfect.

Warli Painting On Wall


After all the patterns were done Mr. Nihalani suggested that we should make something on both the corners above and this is what I painted, inspired from one of the printouts she had.

Warli Painting On Wall

Here is the final look of the wall. Isn't it a pretty sight.

Warli Painting On Wall

And now have a look of complete balcony. Both the walls in all their glory. Mrs. Nihalani gave a lovely complement by saying "please appoint me as your assistant when you become famous and whenever you paint something like this. 

Warli Painting On Wall

Do you like to meet the artists, here you go.....


All happy, pleased and content with what we have created.
Now what do you think my dear readers, did you like my work. Which wall is your favourite one. 
I will be waiting to know your views :)


P.S. All images are mine and subject to copyright. Please don't use them without my permission.