Thursday, 25 April 2013

Birdcage Table


Do you ever run across something


That just


Steals your 


Heart?


Well, that is what happened when I found this huge bird cage table! Who ever sees something like this? I know I don't.


I just had to have it and the best part is, it was very inexpensive since I found it at a garage sale!


But when I got it home, I had to figure out where to put it!


That's

Cracked Effect Painting Technique

For regular updates like my Facebook page (click here)
Today I am sharing very easy and fun to do painting technique - Cracked Effect. Its easy and result is just awesome. It can be done on wood, paper, ceramic, canvas and earthenware. Colors can be acrylic or metal colors for extra shine. I chose terracotta pot and acrylic colors.I had clicked all the pictures from start to end of the project but sadly my gadget wizard kid deleted some of them. I'll try my best to make you understand the complete process.

Supplies: 
Object (Which you want to paint like I chose clay pot )
Acrylic/Latex Paint
Brush
Crackle Medium or all purpose glue

Step 1: Wash terracotta pot and let it dry. Choose two contrasting colors. I chose Pink & magenta.
Step 2: I always prefer to prime the surface as it gives better results. You can skip this step though. 


http://designdecoranddisha.blogspot.in/
Primed pot

Step 3: Now paint the pot with chosen color and let it dry completely before proceeding.

http://designdecoranddisha.blogspot.in/

Step 4: Now apply crackle medium or all purpose glue on the pot. Thicker layer of glue will give larger crackling effect. to achieve fine cracks apply thin layer. Apply it evenly on the surface.
Step 5: Apply top coat immediately as crackle medium dries very quickly. Apply the second chosen color lightly with soft brush or you can spray paint to make it fast. Keep in mind here that you should not use hard brush strokes as paint can run through the glue and you can't achieve cracked effect then.
Now let it dry completely. Cracks appear as soon as it starts drying.

http://designdecoranddisha.blogspot.in
Night shot 

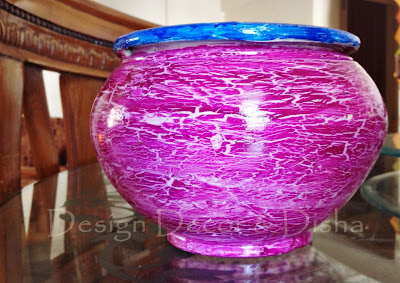
Here is my finished product. Looks cool. In the last I applied lacquer to give a protective coating.

http://designdecoranddisha.blogspot.in

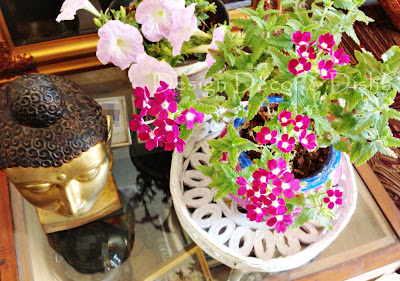
Potted verbena that has magenta blooms and looked perfect.

http://designdecoranddisha.blogspot.in/

Happy indoor as well as..............

http://designdecoranddisha.blogspot.com


http://designdecoranddisha.blogspot.in

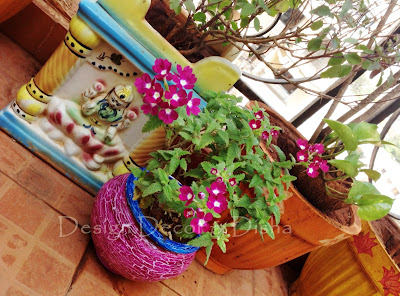
Outdoor.

http://designdecoranddisha.blogspot.in


My Rainbow terrace garden has few more colors now :)

http://designdecoranddisha.blogspot.in/


http://designdecoranddisha.blogspot.in/


Wish you all a very happy and creative weekend!! Keep creating!!


Tuesday, 23 April 2013

Do You Have Rules ...

Greetings, friends!

By now, I hope all of you are starting to see true signs of Spring!  We've been enjoying a bit warmer weather (except for today), and I think hope *pray* the pollen is just about gone!  And, while I should be playing outside ... I find myself INside, *tinkering* with another little vignette ... this time, on our sofa table.

Let me just say that I truly admire all of you who can crank up the tunes and throw a vignette together without a care in the world!  My crazy mind doesn't usually allow that to happen because of my *OCD self-inflicted decorating rules!*

You see ... when I start on a vignette, usually I have to start with the center of my vignette and work my way out because, if I don't, *bad* things will happen!  Because of that rule, this little guy got to stay: 


To balance the height and colors of the ship, I then brought in a lantern from the porch:


And, because a large meteor would strike if I didn't add another coastal element to tie in with the ship, I then placed a battery operated candle inside the lantern and wrapped it with nautical rope (that they now sell at Michael's ... perfect length, too)!


Then, to keep with the feeling of Spring, I added not one, but TWO of my IKEA faux plants side by side ... while they're both in cute urns from Michael's, I placed one on top of a candle holder to give it a bit of height over its twin:


That's when I reminded myself of my *self-inflicted decorating rule* number 10,289 ... that if I have something on one side, I HAVE to have something similar, if not the same, on the other side because, if I don't, I won't be able to sleep!  Thankfully, I had another plant from IKEA on hand ... I placed this one on a little dessert stand:


And, then as a finishing touch (you know, because I *have* to have a finishing touch), I added this little sign in front of the boat:


All together, it looks like this:


And, as I look at it, I realize that the lantern needs to be higher to balance better with the lamp ... seeee ... here comes the OCD again!

Once I fix that AND find a perfectly narrow basket or trunk to go under the table, I'll be done ... for the moment, anyway:


ONE of these days, I'm going to throw caution to the wind and not care about symmetry, balance OR my decorating rules!  Wanna take a bet how long that will last?  LOL

Partying over here ... come play:

A Stroll Thru Life/Inspire Me Tuesday
My Uncommon Slice of Suburbia/Tuesday's Treasures
Savvy Southern Style/WUW
DIY by Design/Swing into Spring

Thanks so much for stopping by!

post signature

Friday, 19 April 2013

Then & Now Part I


Talk about change! The pictures that I am about to share with you show what the changes in the past 10 years have been, from what it looked like right after we moved in,
to what it looks like now.

However, it also shows...

...It shows just how much my decorating style has evolved
...It shows my maturity in taste as I am aging
...It shows how cameras have improved
...It shows how DIY and

Tuesday, 16 April 2013

Time for a Small Change ...

Greetings, friends.  

So, tell me ... when you're ready to create a new vignette, where do you go for inspiration?  Do you go visit your favorite blogs ... logon to Pinterest ... pick up your favorite magazine and thumb through the pages ... or, just play, play, play until you get it semi-right?  If you're like me, you'll probably say "all of the above!"  

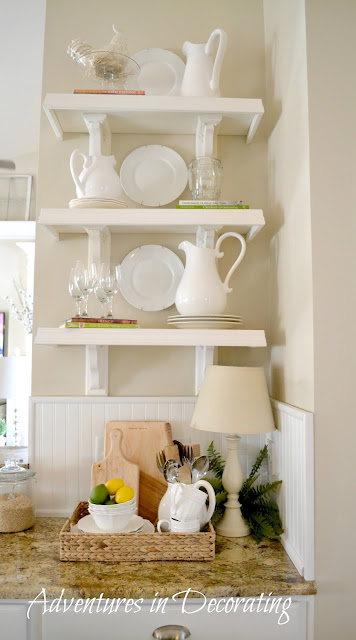
Such is the case with the new, simple vignette I created on the counter in our kitchen.  If you've logged on to Pinterest even just *one* time, you've probably seen this absolutely amazing image from Heather Bullard's fabulous kitchen (source: http://heatherbullard.com/2012/03/kitchen-corner-shelf/):


I love everything about it ... the brightness ... pops of color AND the fact that there are already a few common elements between hers and mine, such as the bead board backsplash and white, wooden shelves.  I love the vignette she created in her beautiful woven basket ... I knew I wanted to do something similar:

I started with a pretty woven basket I had on hand (from Home Goods):


And, while I wish I had Heather's awesome collection of bread and cutting boards to layer in the back, um, I don't.  So, the ones I had on hand will have to do ... for now, anyway:  


I then added a couple of coffee cups with a pretty beaded detail ...


along with a few matching dishes, including these pretty bowls (all from Tuesday Morning).  And, like in my inspiration picture, I just *had* to add a few  lemons and limes for the perfect pop of color (although, mine are fake ... surprise, surprise, right?):


I also moved the pitcher filled with utensils on over from beside the stove:


And, here's what it all looks like:


And, as a side note ... once I finished my little vignette, I decided to bring out three extra glass canisters I wasn't using ... love how it all complements each other:


Until the "next" vignette starts to unfold ...

Have a great day and thanks for stopping by,

post signature

DIY: Mineral Water Can Planter

For More updates like my Facebook Page(Click Here)
How was your weekend friends. Mine was very busy and creative one. Here I am with this month's DIY project. I had this mineral water can lying unused since ages and if you know me well then you must be aware that I love hoarding junk. 
This water can had grown algae inside it and was in very bad shape. I would have thrown it in trash but then an idea sparked and I turned it into a pretty planter. Wanna see how....lets check out...

Here is an ugly almost gone water can.


Then I cut open it's upper part and thought I should have thrown it but then I washed it thoroughly and I felt like I can do something of it.


I drew some pattern on it with marker and then traced the pattern with hot glue.


Pattern on the water can looks like it is embossed. 


Here is a different view of the can. Then I painted it in green and Voila!!!!


Here it is.............. sitting  beautifully in my garden.


Then bringing it inside the home was a better idea. So here is it's new place. Next to my dresser.


Giving it company is my Madhubani pot.  Pretty isn't it. I like it. I am glad how it turned out.


Closer look at pattern. I could have hot glued more patterns but then I became desperate to finish the project.


What do you think. Will you try this. If yes then do share your images.


Stay tuned to know about some unusual uses of things. Have a fabulous week!!
Keep creating! Keep recycling!


Monday, 15 April 2013

Feed Sack Chair


Through this past year, I have collected several old feed sacks. I have made pillows with some of them...


Covered a chair seat with them with one of them...


Even recovered a child's rocker with one of them...


 Actually there are so many things you can do with them including making a lining out of them for a rolling cart...See it down in the larger picture with the pillow sticking out