Thursday, 30 October 2014

Inspiring Eminent Artist: Yulia Brodskaya

 Dear readers I am back after a short vacation. Hope you all had wonderful Diwali, mine was great too. 
Today I am featuring a Paper artist who is joining us all the way from Russia. She is blessed, enjoys doing paper quilling in her own unique and innovative way and her work is mind blowing. You must have seen lot of paper quilling work earlier but, this is something extra ordinary and very innovative. Dear readers sit back, relax and enjoy reading about this wonderful artist-  

Yulia Brodskaya, is a Russian paper artist and illustrator. She uses simple materials like paper, scissor and glue and turn them into something mesmerizing and out of the world creations. She started working as a graphic designer and illustrator in 2006, however she left her job to follow her heart, her passion for paper art: "Paper always held a special fascination for me. I've tried many different methods and techniques of working with it, until I found the way that has turned out to be 'the one' for me: now I draw with paper instead of on it".

Her work reflects hard work, passion and dedication. Have a look of her wonderful art work below. How carefully and neatly she places the paper stripes to create a masterpiece. I loved the intricacy of her work. 

Yulia Brodskaya

Isn't this something extra ordinary and beyond imagination.

Yulia Brodskaya

She has earned international reputation and has worked with many big names. Below is one more beautiful creation by Yulia. She has a vast collection of  Quilling typography too.

Yulia Brodskaya

I loved the way she places different kind of quilling patterns and pulls off everything so beautifully. Look at this quilling bird, such brilliant use of vibrant colours and unique patterns. 

Yulia Brodskaya


Yulia's artwork is outstanding and one of its kind. She creates unique pieces and has distinct style. I was in awe when I saw this tropical fish. The swirls and twirls are so eye catching.

Yulia Brodskaya


Yulia Brodskaya

 Yulia's each and every creation speaks a thousand words. She is such a passionate and dedicated artist. She is invited at various design conferences and design schools around the world to speak about design and art.

Yulia Brodskaya


Her artwork is owned by Oprah Winfrey too and why I am not surprised!! Her clients list has many big names. Her work has been featured in many books.  

Yulia Brodskaya

She has created theme for Google chrome too. Recognize this Google Chrome bird!!

Yulia Brodskaya


Here is a surfing-themed cover art for the FahThai, an in-flight magazine she designed for Bangkok Airways.

Yulia Brodskaya

Cover art for Pure Magazine.

Yulia Brodskaya

She has many feathers in her cap. Go on and read more about her here on her website ArtYulia. She also keeps updating her fans on her Facebook page PaperDesignArt. I am completely in love with whatever she creates and I admire all her artwork. Thanks Yulia for this wonderful treat. I wish you a great success ahead!!

So how do you like meeting this artist my dear readers......enjoyed thoroughly....I know!! Stay tuned and I have some more things to share.

P.S. All images are provided by Yulia Brodskaya and subject to copyright. Please don't use any image without her permission.


Tuesday, 28 October 2014

Vintage Shabby Chic LivingRoom!


 I thought you might like to go on a tour of my friend Gail's living room! She freshly painted the walls which as you know means, An excuse for a whole new furniture and art placement.


The room is so large, Gail is able to have back to back sofa's.


 Gail is a DIYer and loves to craft.


The house is an old Dutch Colonial with very high ceilings and large spacious rooms.


 She has a soft

Wednesday, 22 October 2014

Beautiful Book Page WALLS!


I was so OVER my stripe wallpaper...


I had been wanting to put book pages on my walls FOREVER...


After much thought...


I came up with the perfect idea!


To refresh your memory...


The study walls had Waverly stripe wallpaper. A few years ago (probably longer than a few), I was at Lowe's and found clearance wallpaper...3 rolls to be exact that I bought for a whopping $3. At the

Sunday, 19 October 2014

Blushing Pinks and Sparkling Silver this Diwali.

In India, weeks leading to Diwali: The festival of Lights I would spend looking for interesting diyas ( earthen or ceramic oil lamps) flooding the local markets.
Back here in Minnesota what do I do?
I visit estate sales. 
They are treasure trove for people like me who are on the look out for unique finds.
I love combining vintage with the new. Styling classic with a bit of kitsch.
So this Diwali I decided to put together some colourful vignettes with things collected, gifted, bought and inherited.

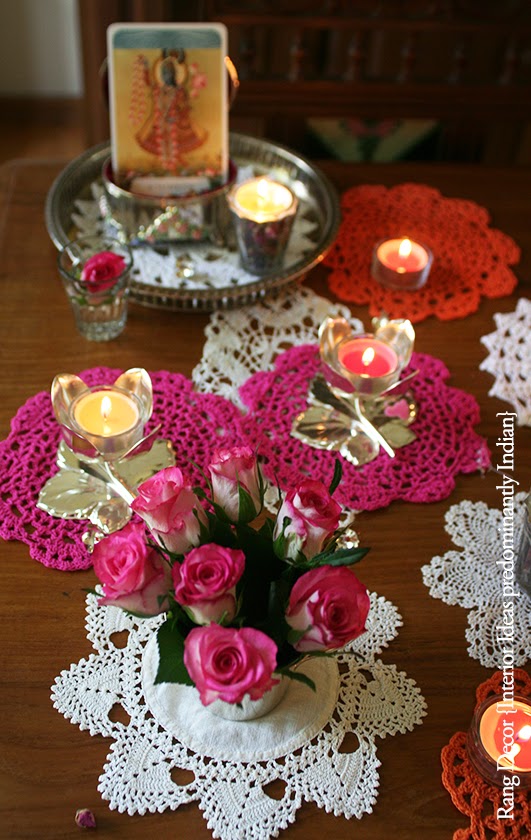
I picked up some vintage white & cream doilies at a church sale recently and the hot pink & orange ones were leftovers from a sewing project my mother was working on when she visited us in Spring.

A palette of hot pink, orange and white. A pair of floral silver-plated tealight holders from the estate sale gets teamed up with a Good Earth Silver cup with parrots engraved gifted by a dear friend.

The warm glow of sesame oil lamps. A divine photo card engulfed by dried rose buds and placed in a silver plated hinged box with painted roses...

The silver cup with engraved parrots transforms into a vase holding a bunch of blushing roses…
Single blushing rose buds in my favourite 'chai gilaas' adds fun element to the arrangement.


A closer look at the the floral tea light holder…


The sparkling bokeh sets the mood for Diwali festivities...

Add loads of fragrant candles and scattered some delicate metallic flowers...
The silver tea light holders standing out against the hot pink doilies…


A closer look at the silver-plated hinged box with painted roses…

A side view of the photo card…


This is a simple but charming piece, I took a 'chai-gilaas' filled it with a handful of dried rose buds. Placed a floating oil lamp on the rim of the glass. Voila!

While I was shooting this vignette I realised that  the colours in the frame were Rang Decor's masthead colours!

This is a simple Diwali vignette that can be created on your coffee table or a hallway table. It's all about combining different elements & textures, vintage & contemporary and most of all going with your heart!

Hope all of you have a wonderful Diwali surrounded by beauty, happiness, family and friends!

( Images styled and photographed by Archana Srinivas. They are copyrighted. Please do not use without permission)


Saturday, 18 October 2014

Diwali Decor Ideas- Part II

Thank you so much dear readers for overwhelming response to Diwali Decor Ideas-  Part I
With your encouragement and support here I am bringing to you some more video tutorials on how to make Paper Flowers for Diwali in an easy-peasy way. You must have seen my Diwali Wall Hanging video tutorial, if not then click here.
Sorry for the delay in publishing this post. As I tried several times to upload video on Youtube using my laptop and every time something wrong happened and it failed to upload, then I picked up my Venue tab and believe me it was quick and easy to do it using Venue. Now lets start.............

See this picture collage I made using my venue tab.
Diwali Craft Ideas
Diwali Decor Ideas
In this post we'll learn to make some easy flowers that can enhance the beauty of your space and definitely your Diwali will be special and memorable one. 

Tissue Paper Marigold Flower:  

Tissue Paper Marigold Flower
Tissue Paper Marigold 
This is the easiest paper flower that anyone can make, even small kids too. My Mum taught me this flower when I was around 8 yr old. I Enjoyed making it so much that I made a bouquet of it and I still enjoy making it. Below is the Tissue Paper Marigold Flower video tutorial. Sorry I used white tissue paper and not yellow as I was running short of time and used whatever I had with me. You please use yellow tissue paper for making perfect marigold flower. 


Tissue Paper China Rose Flower: 

Tissue Paper Flower
Tissue Paper Flower
One more quickest and easiest way to add charm to your space this Diwali is decorate your home with these tissue paper China Rose Flowers. Making them is not a hassle at all. Just two steps and you are done. One tip from my side- use different colour of tissue papers and make lots of colorful flowers. You can use two shades of same colour for making a flower and put them around rangoli or around any decor piece. Below is a video tutorial:


Diwali Hanging: 

Diwali Flower Crafts
Diwali Flower Hanging
This can be little tricky but not difficult at all. It looks beautiful if you make it large. You can use craft paper/ chart paper/ handmade paper to make this flower. First make petals and then stick them. Stick 3 petals or 4 petals or may be you can stick different colour petals in a single flower. Below is a video tutorial:


All thanks to Venue tab that I could publish this post in time, before leaving for Diwali celebration at my in-laws place. Yes dear readers now I'll be on short vacation and wouldn't be able to reply your mails and queries. Please be patient and after coming back I'll answer each one of you.

Now lets have a look of some gorgeous pictures that one of my dear reader Vipula Bhagtani has sent me. She has done up her space very beautifully!! She has a lovely Facebook page too "Kundan Rangolis & Diya". Like her page to stay updated about her amazing work.

Diwali Decor Inspiration


Diwali Decor Inspiration

Diwali Decor Inspiration


Some more Diwali inspirations you can find on my blog. Click the links below:
Diwali Decor: My Home
Diwali Decor Ideas Part-I
Diwali Craft Tutorial: Lantern DIY
Diwali Wall Hanging Tutorial
Diwali Gifting Ideas
Diwali DIY Tea Lights
Diwali Decor Inspiration
Diwali DIY: Silver Plant
Diwali Decor Inspiration: My Home

I wish you all wonderful readers a very happy, prosperous and safe Diwali!!!


Friday, 17 October 2014

Empire Dresser Reveal


This is probably the 
most intense
and hardest
DIY project 
that I have 
worked on...


in a long time!

Here's the story...

I found this old Empire dresser for only $15.  It stunk and had a missing drawer.


I thought I could save it from the dump.


I brought it home to Hubby saying that it should go in the burn pile! I had a feeling that he might be right on that statement!


I washed

Thursday, 16 October 2014

Our New Kitchen!

Greetings, friends!

So, here we are in the kitchen right before we moved in ... beautiful wood floors, pretty birch cabinets and tile backsplash.  


And, then THIS happened.  Oops.


I know some of you may be gasping that I took a paint brush to brand new cabinets and tile backsplash.  Trust me, for a moment, I did, too.


But ... then I reminded myself that, while I love the dark floors, cabinets and backsplash separately, I didn't care for them all together.  To me, they blended into each other, not allowing one or the other to stand out.  Plus, knowing how much I loved the kitchen in our old home ... to have this one resemble it would make this house feel more like *home.*  

So, I continued to get busy! 

I sanded/primed the cabinets and then added three coats of Ben Moore's "White Dove" to each one.

To break up the white a bit, I painted the pantry, garage and storage doors Rustoleum's Semi-Gloss Black.


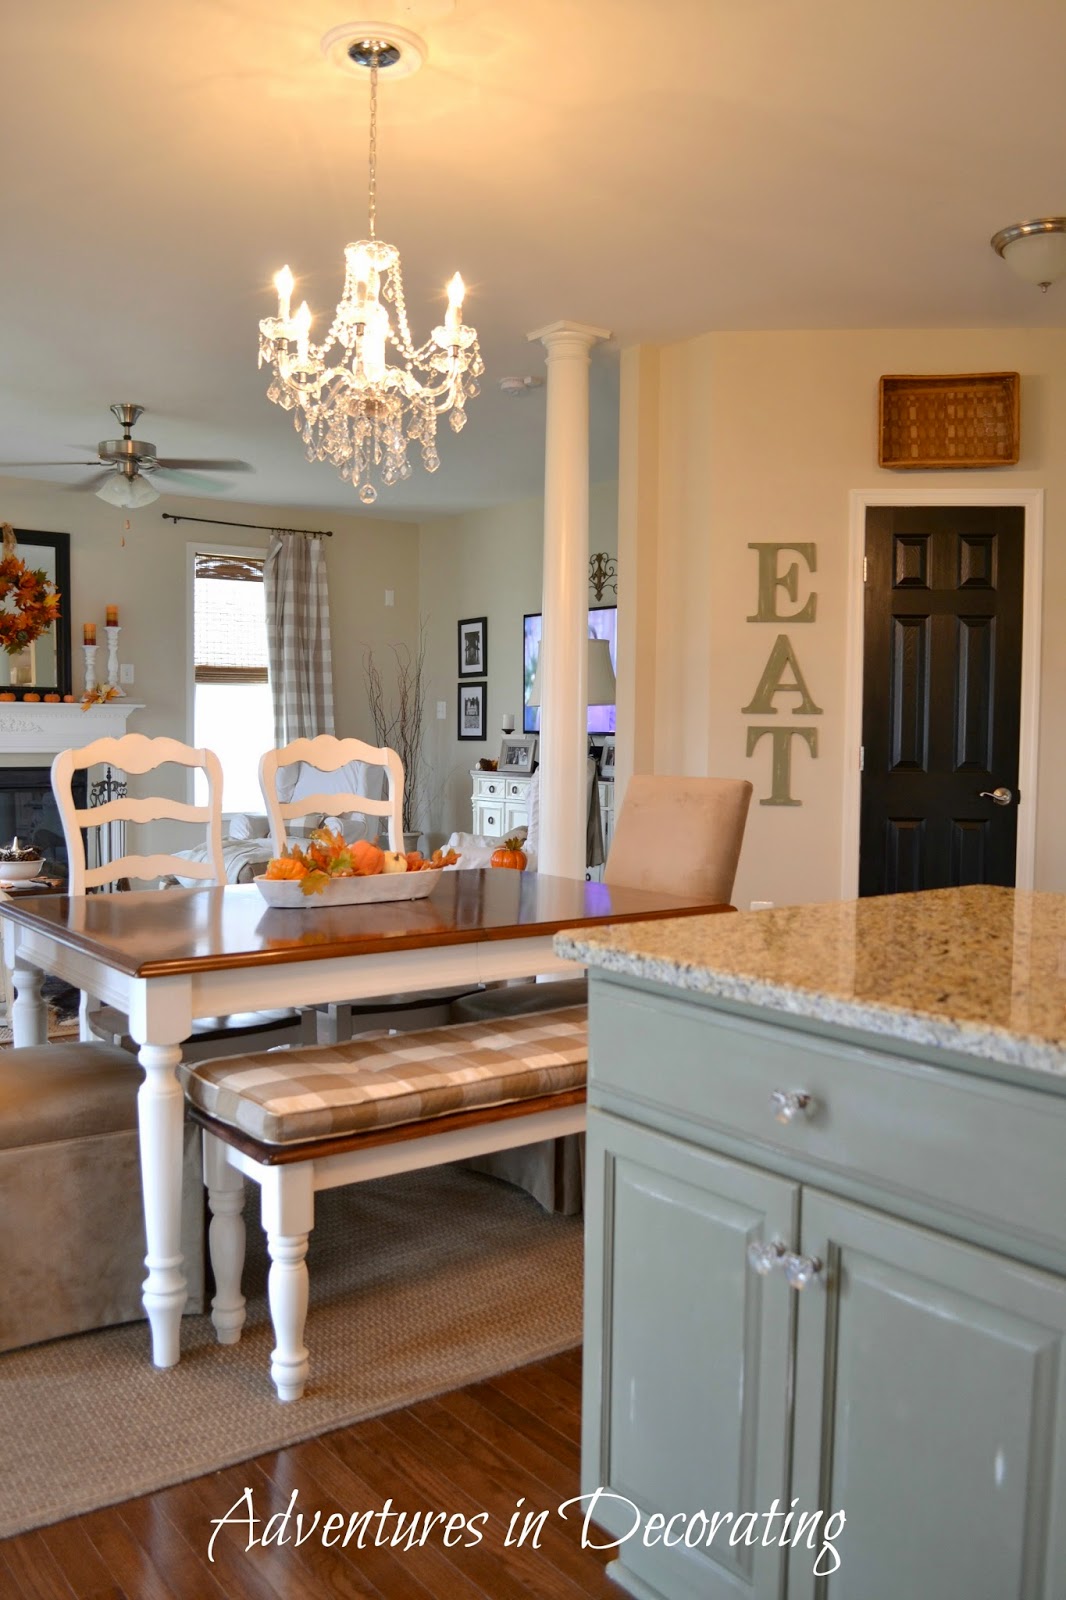
I also dug out a can of Chateaux Grey and painted our island, adding the same farmhouse legs that I did to the island in our home in SC.


SOMEday, we'll replace its granite countertop with butcher block.


With ample storage in here, I didn't feel *too* guilty when I asked my husband if he'd consider taking down one of the cabinets so that I could put up a few open shelves like we had in our old home.  With the help of our neighbor (and his crow bar) down it came,

and up went the shelves!  


An inexpensive project (shelves and corbels from Home Depot), which makes for a great display area!


Our Wal-Mart canisters made a return appearance, too ... an easy way to display seasonal or day-to-day items:


Yes, I "give thanks" alright ... every time I use the gas stove without causing a fire.  I admit it, gas scares me!


On the other side of the kitchen is our "walk in from the garage dropping zone."


Yes, keys, phones, mail and book bags are plopped here, especially while a scoop of a Fall mix is inhaled.


I thought this cute mug tree would be a nice addition to the coffee/tea "station," so, I clicked "add to cart" when I saw it on Amazon.


Along with spray painting all of the knobs pewter, a couple of little embellishments were also added, such as these drawer pulls (Lowe's),


along with wooden scrolls to two faux drawer fronts.  


One of my favorite additions to the kitchen is the bling (Home Depot)!


She's like the crowing touch to the room!


Of course, I had to add her twin over the table, too!  (With these chandeliers being a mere $99/each, it was an affordable and justifiable "splurge.") 

Annnnd, I had to bring back our "E A T" letters, too.  I thought it only fitting to place them right beside the pantry.


What's that saying?  One is good, two is better?!  


From this angle, you can see our Fall Family Tree (a yearly tradition in our home):


Tucked in a little corner.


I always add "familial" sayings ...


 and pictures of our family that mean so much!


One more time ...


Annnnd, AFTER!


We're not done in here yet ... as our budget allows, we'd love to add crown molding, a board and batten backsplash, a butcher block top to the island, and a wooden beam or two.  For now, we're enjoying our new space!

Thanks for stopping by,

post signature