Showing posts with label crafts. Show all posts

Thursday, 24 April 2014

DIY: Newspaper Wind Chime

Don't miss any update from my blog like my Facebook Page(Click Here)

Today I am posting DIY after a long time. It's again my favorite newspaper craft. 
This time I made wind chime from newspaper. 

Lets start:
First step of making newspaper sticks/rolls you can find by clicking here. Make 20-22 sticks.
1. Now that you are ready with fair amount of sticks with you, take one stick and make a tight coil of it. Make one coil with one paper stick and make total of 12 coils of approx. 1" diameter. Make one larger coil of approx. 4" diameter. Now you have 12 small and one larger coil.
2. Now apply glue on all the sides of the coil with the help of brush. 
3. Before glue dries completely place your thumb in the center of the coil and then slowly and gently press it outwards as shown in the image. 
4. Repeat step 3 for all the coils. They will be bell shaped now (no. 4) Apply glue once more, let it dry and then prime it. You can paint them in your choice of color at this stage or can do so later. 

Newspaper craft
Newspaper Wind Chime Tutorial

5. Now take out some old magazines and make paper beads in 2-3 different sizes and shapes. You can find tutorial here. I made 1" and 1/2" paper beads. Red, yellow and orange in colour. You will need some jewelry making tools too like flat nose pliers, cutter, scissors, nylon cord and ghungroo (jingelling bells).

Newspaper Craft
Newspaper Wind Chime Tutorial

 6. Now make a knot at one end of the nylon cord and thread a ghungroo and then long bead.
7. Now thread a small bell.
8. Thread more beads so that it is not more than 2".
9. Now with the help of needle attach this string to the larger bell.

Newspaper Craft
Newspaper Wind Chime Tutorial
10. Now make another string. Repeat steps 6 and 7. Repeat step 8 but keep in mind every time you need to increase the length of string by 2". make total of 12 such strings and attach them to the large bell at equal distance. It will look like this....

Newspaper craft
Newspaper Wind Chime Tutorial
If you want to keep it like this then you can give a coat of varnish at this stage too. But I love it when my hands are smeared with colours so I went ahead and coloured it with acrylic colours. I chose red, orange and yellow. As these colours go well with the paper beads I have used in strings. Let it dry for 4-5 hrs and then give a coat of varnish to make it water proof.
This is how it looks :))) I am super happy with the result.


Newspaper Craft
Newspaper Wind Chime Tutorial
I went crazy and tried to click it from every possible angle, up, down, right and left ;P

Newspaper Craft
Newspaper Wind Chime Tutorial

Newspaper Craft
Newspaper Wind Chime Tutorial
You must be thinking whether it makes sound or not. Yes it does. Whenever gentle breeze passes through, it makes relaxing and soothing sound. As ghungroos are attached at the end of few strings :)
Have you ever made something like this before, please do share here I would love to see it!! If you are seeing it for the first time, I will suggest you try to make one. it's super easy but yes needs lot of patience.

See you soon with a review of my favorite store on my blog.
Till then Reuse, Recycle and Stay Creative!!Happy Weekend!!


Thursday, 22 August 2013

DIY: Sunburst Mirror

Don't miss any update from my blog, like my Facebook Page(click here)
Here is long due and promised post on Sunburst mirror tutorial. Lot of readers mailed me to know how to make this sunburst mirror, so here I'm sharing it with you all lovely and wonderful readers :)

http://designdecoranddisha.blogspot.com


Supplies:
Hardboard -2 (8 Inches diameter)
Mirror-1 (8 Inch diameter)
Skewers 32 (I used broom sticks though)
Glue gun
Embroidery mirrors in 2 sizes
Stones/sequins
Card stock
Craft glue
Scissors
Hook
Acrylic color of your choice
Paint Brush
Step 1:
Get mirror of your desired size. Stick back of the mirror to the hardboard with glue.


Step 2:
Cut the card stock diameter greater (Approx. 2 Inches) than  hardboard/mirror's diameter  Now on this card stock draw a circle with diameter 4 Inches less than mirror and cut it with paper cutter/knife. Inner circle is of no use. Keep the remaining part.


Step 3:
Paste this card stock on mirror as shown.


Step 4:
Stick sequins/stone in a way so that it is half on mirror and half on card stock.


Step 5: 
Now mark the back side of the mirror i.e. on hard board side as shown in pic. Tag every mark with B for Big Skewer. M for Medium Skewer, S for Small Skewer. If you want to keep all the skewers in same size then no need to tag them.


Step 6:
Cut the skewers in three different sizes. Small, medium & big as shown in pic.  


Step 7:
Stick all the skewers accordingly. That is big skewer on tag B, medium on M & small on S. Let it dry for at least 2 hr. Refer pic below.


Step 8:
Now stick another circular hard board on this arrangement of skewers (i.e on the back side of sunburst mirror) and fix hook on it to hang it on wall.

Step 9:
Turn the mirror side up. Now start sticking embroidery mirrors on these skewers in a manner that you like. Try different orientation  and go for the one you like most.


Step 10:
Now color all the skewers in golden color or color of your choice. Let it dry.
Sunburst mirror is ready. You can go wild with your imaginations. Try making one and let me know.


Here is my sunburst mirror that looks beautiful against my mango yellow wall


Hope you will love this and will going to try this :) Happy creating!!


Monday, 19 August 2013

Fan Of The Week: Bhumika Awasthi Chaudhary

A week ago we met a very talented and creative mind 'Shashwatee Raut' and it's time to meet new talent of the week. Dear readers joining us today is 'Bhumika Awasthi Chaudhary' of 'Paper Passion By Bhumika'She filled my heart with joy when she said that it's all your effect and humbly named it 'The D effect' :)
This is what she shares with us:

Well first of all thanks for having me here on your Blog, its not only because you invited me here but its because you have always been a great source of inspiration for me. It’s a wonderful opportunity to connect with other talented people around the world. I am a stay at home mom of a three and half year old son, currently I’m in US, I did my MBA, but after coming here in US I had no choice but to stay at home.
I don’t like to sit idle, so I just love to do what keeps me busy and give me inner satisfaction. I know I’m master of none but you can call me jack of all trades. I make jewelry, I do calligraphy and various craft projects.


I was desperate to do something in spare time, while surfing internet I came across a link related to quilling, instantly I felt in love with the simplicity and beauty of the art and that's when I decided that I will try my hand on this.

Here are some of her master pieces.
 I’m in love with quilling, especially jewelry, apart from that I believe in reduce, reuse and recycle, so I use all those stuff that is considered useless or trash like tissue roll, old plastic bottles, boxes etc. 
She made these beautiful Lotuses in different vibrant colors using pistachio shells :) Tell me isn't that beautiful.

Some more paper jewelry by Bhumika.


Whenever people around me appreciate and encourage me for my work, it certainly boost my spirit and keeps me going. My biggest inspiration and support is my husband who always encourages me. He is my biggest strength. I love to spend time with my lil' one, other than that I love to cook.


 She tried different quilling techniques to make these cute butterflies.
Fantastic artwork Bhumika I must say. For placing orders and to know more about her work visit her Facebook Page 'Paper Passion By Bhumika' and show some love by liking it :)

See you all with a long due post on some DIY project. Stay tuned!!

P.S All images are provided by Bhumika and are subject to copyright.

Linking it to Tuesdays At Our Home


Friday, 22 March 2013

DIY: Bird House

Don't miss any update from my blog. connect with me on my Facebook page click here.
So it's my third DIY/recycling project in this month. Isn't that fantastic. Well the first one was Decorative tray made out of old newspapers and the second one was hanging planter made of plastic bottles.
I am sure that this third one that is bird house made of plastic food container, you will enjoy more than any other DIY in this blog. Before summers arrive be ready to provide food and shelter to lovely little birds. This project is kids friendly and you can involve your little one also. Let's start here:

1. Gather your supplies

http://designdecoranddisha.blogspot.in


     1. Cardboard
     2. Scissors
     3. Knife
     4. Paper rolls (how to make learn here)
     5. Glue
     6. Plastic food container
     7. Food container's lid
     8. Acrylic color
     9. Brushes
    10. Twine/rope

Step 2. Make a small hole at base of plastic container.

http://designdecoranddisha.blogspot.in

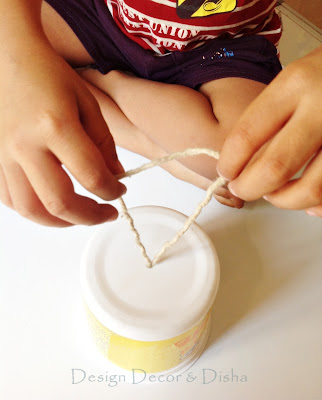
Step 3. Insert both the end of twine in this hole to make a loop and make a knot inside the container. It will look like as shown in image below. It will be used for hanging the bird house.

http://designdecoranddisha.blogspot.in


Step 4. Put the lid on, press it properly.

http://designdecoranddisha.blogspot.in

Now glue the lid using hot glue gun.

http://designdecoranddisha.blogspot.in

Step 5. Now it's time to prime it. Use acrylic color.

http://designdecoranddisha.blogspot.in

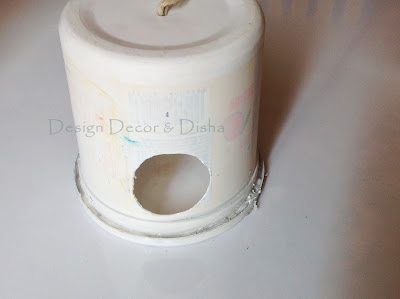
Step 6. Now cut circular shape 2 cm above the base of the container that will serve as an entrance.  

http://designdecoranddisha.blogspot.in

Step 7. It's time to make a roof. Cut the cardboard as shown below.

http://designdecoranddisha.blogspot.in

Put one end on the other and glue it.

http://designdecoranddisha.blogspot.in

Step 8. Here you will need all the paper rolls. Start sticking rolls one by one on this cone shaped roof or you can skip this step and directly paint this cone in your choice of color.

http://designdecoranddisha.blogspot.in

Step 9. Now the roof is also ready. Prime it and then paint both the roof and house in your choice of color. Don't forget to give a top coat of varnish.

http://designdecoranddisha.blogspot.in

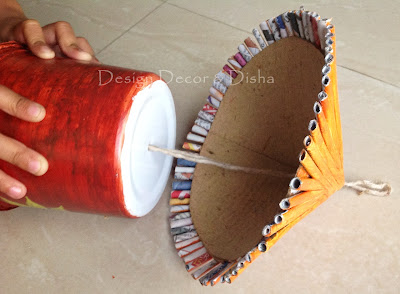
Step 10. Now pull out the twine loop from a hole on the top of the roof. Bird house is ready.

http://designdecoranddisha.blogspot.in

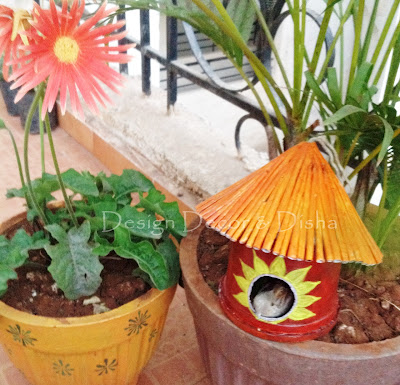
This is how my birdhouse looks. My Son enjoyed this DIY thoroughly and I am also very happy to see how it turned out :)))

http://designdecoranddisha.blogspot.in

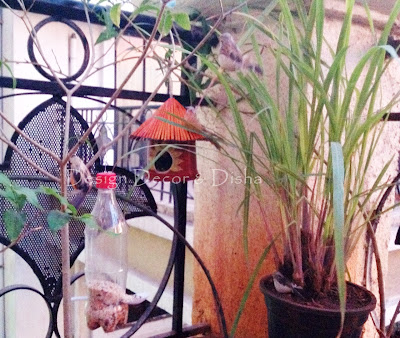
I tried placing and hanging it around different places in my garden until I found suitable one.

http://designdecoranddisha.blogspot.in

Near bird feeder.........

http://designdecoranddisha.blogspot.in

Under the palm.........

http://designdecoranddisha.blogspot.in

Between money plant.........

http://designdecoranddisha.blogspot.in

On the pillar............
http://designdecoranddisha.blogspot.in


http://designdecoranddisha.blogspot.in


http://designdecoranddisha.blogspot.in


http://designdecoranddisha.blogspot.in

And finally hung on a branch which I found the most suitable place in my garden as this part doesn't get lot of sunlight.

http://designdecoranddisha.blogspot.in


What do you think of my bird house. Do you have a bird house share your images on my Facebook page and I would love to feature it in my blog :)